Here in the UK there are a lot more, and intense, than in Ontario. As OFSTED comes around to evaluate the teachers and schools, it is important that all of the teachers are up to par. I have had two formal observations so far, both of which went well, and I have learned a lot from them, which I figured I would share to all of you:
1) Make "Extension Sheets" for your G&T, FSM and students who complete the work quickly or easily. These extension sheets take what you have taught in the lesson and extend it to either the up-coming lesson or knowledge outside the scope of the course. These sheets will show your observer that you are encouraging your students to go up and beyond the course requirements. This is a simple method that you could use to gain great marks on your observation.
2) State when you are going off your prepared lesson plan. Everyone knows that lessons and student behaviour may not always go as planned, and it is okay if you deviate from your plan, but you need to let your observer know. By stating that you are deviating from your lesson plan, you are acknowledging that your students require a different teaching method or strategy.
3) Plan a started for before you take attendance/register! Having a list of "to-do's" on the board for students to complete as soon as they come into the class will begin the learning process right at entry of the classroom. Observers love this as most students will begin to complete the learning activities with little prompt for you as their teacher. Independent and interdependent learning are always bonuses in an observation.
4) Have a good exit strategy. Just like any good plan, have an exit strategy. At my school they says "control the exit" of the students. Tie the lesson together with discussion questions or a final culminating activity that will demonstrate all of the learning by the students in that lesson. Not only is this for the observers to see the student's learning, but it is also for you as the teacher to gauge how much learning had been accomplished! I have begun to use this and will continue to use it in the majority of my lessons, not just my observations.
Hope this checklist assists you in rocking your observations!
Friday, September 28, 2012
Friday, September 21, 2012
ActivInspire
My maths classroom that I teach in unfortuantely does not have a SMARTBoard. It does however have an ActivBoard by Promethean. Throughout my Bachelor of Education experience at Queen's University, we were only taught how to use SMARTBoards in the classroom, so this is quite the change; new software, at a new school with multiple new classes. As I am teaching some of the lower band classes, I have determined that the best way to get them engaged in their learning is to make it fun and exciting for them. And what better way to do this then with an Interactive Whiteboard.
Here are some of my adventures with the ActivBoard this week at school.
1) A student, who was uber excited to use the board, came up and tried to take "the lid off of the pen". Unfortunately the Year 7 did not realize that it was not a real pen and with all of his strength he managed to pull the top off of the pen. Either this student was super strong or it does not take that much to remove the top half outer-layer of an ActivBoard pen.
2) Next time you are measuring angles or drawing a straight line, always use the protractor, compass and ruler tool. By placing these on your customizable toolbar, you are able to quickly grab and use these tools. Hint: do not have a black background on yo flipchart as the ruler seems to "disappear." The ruler is a very useful tool as as long as you draw somewhere "on" the ruler, you will have a straight line appear. To exit these tools select the icon in the middle of the tool and this will give you the option to close.
3) Using the board as an incentive for students is a great asset in the classroom. Especially with the Year 7's who are new to the school, students will remain seated and silent to have the opportunity write on the interactive whiteboard. In my classroom, only students who have remained silent (or worked very hard) during the independent seat work have the opportunity to write their solutions on the whiteboard. In addition to this, I ensure that my lesson has enough "questions and answers" so that every student will have the opportunity to use the whiteboard.
4) Play games! I created a "memory card" game for sequences (e.g. one card would have "1, 2, 3, 4, ..." on it while another would have "5") for my lower band Year 7's and they loved it. I required the students to keep the talking to a minimum and was responsible for selecting who went next, but this lesson was more than a maths review. This lesson was a team building exercise for my class. Students were positively encouraging each other as well as assisting each other ifnd the correct card. It was such a great sight to see!
Hopefully through your adventures with the interactive whiteboards, whether it is a SMARTBoard or an ActivBoard, you will find that they are the ultimate classroom tool. If you have used an interactive whiteboard for an ultimate lesson, please share it below in the comments.
Friday, September 7, 2012
Lesson Planning
It has been three days of school and every minute of my time (other side of sleeping, cooking, eating and being on the bus) has been dedicated to lesson planning. Each school does their lesson planning differently; requiring more details on the activities, methods of assessment and homework.
I personally like seeing an overview of the half term, term, semester or year and how many lessons I have for each topic. I would also prefer to have the lesson listed out with teacher and student notes and the timing for each lesson. Placing all of this information in one document that is easily editable and changeable also helps for those last minute changes and modification.
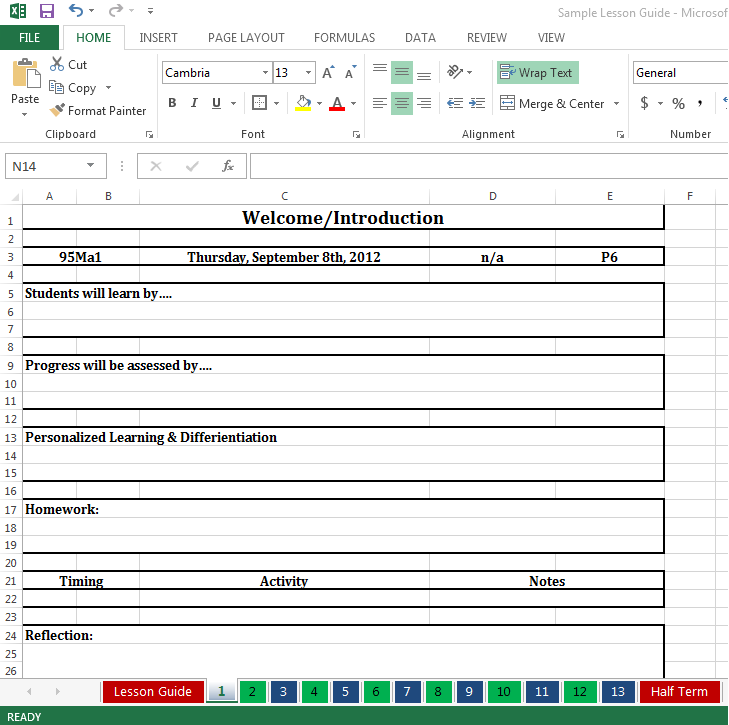
In the excel document I have the first tab that lists the lessons in order of their appearance and organized by the week. This tab includes the title, concepts covered and the homework given. Using this tab I am able to quickly determine what my students have learned and what they will be learning and approximately how many lessons/weeks/terms it will take them to complete the required material. Overall, this is the "bigger picture" portion of my lesson guide.
The next and all subsequent documents are the individual lesson plans. According to my academy these are the required lesson planning sections (or as I have learned so far) just in a different order. I have colour coded all of the tabs to which periods of the day I will see the students. For example in this lesson I see the class two times a week so every other tab is blue to represent Period 6 while the other tabs are green to represent Period 2. I also have a blank "Half Term" tab within the worksheet so that it separates the half terms nicely - this is just for esethics!
An aspect of lesson plans that many teachers do not complete often is the "Reflection" portion of the lesson. In Teacher's College I was informed to complete this section after the lesson and once you have had the opportunity to take a look back on your lesson. I find this component is easier (and I am less likely to forget) if I complete this during the "independent work times" in class. Notes such as the student's behaviours, what we covered, what is left to be covered, notes for future lessons, and other information is always important to keep track.
Here is my most recent lesson guide - if you would like a copy, feel free to email me and I can send you the Excel file. I hope you enjoy the images and the ideas behind my lesson plan guide.


I personally like seeing an overview of the half term, term, semester or year and how many lessons I have for each topic. I would also prefer to have the lesson listed out with teacher and student notes and the timing for each lesson. Placing all of this information in one document that is easily editable and changeable also helps for those last minute changes and modification.
In the excel document I have the first tab that lists the lessons in order of their appearance and organized by the week. This tab includes the title, concepts covered and the homework given. Using this tab I am able to quickly determine what my students have learned and what they will be learning and approximately how many lessons/weeks/terms it will take them to complete the required material. Overall, this is the "bigger picture" portion of my lesson guide.
The next and all subsequent documents are the individual lesson plans. According to my academy these are the required lesson planning sections (or as I have learned so far) just in a different order. I have colour coded all of the tabs to which periods of the day I will see the students. For example in this lesson I see the class two times a week so every other tab is blue to represent Period 6 while the other tabs are green to represent Period 2. I also have a blank "Half Term" tab within the worksheet so that it separates the half terms nicely - this is just for esethics!
An aspect of lesson plans that many teachers do not complete often is the "Reflection" portion of the lesson. In Teacher's College I was informed to complete this section after the lesson and once you have had the opportunity to take a look back on your lesson. I find this component is easier (and I am less likely to forget) if I complete this during the "independent work times" in class. Notes such as the student's behaviours, what we covered, what is left to be covered, notes for future lessons, and other information is always important to keep track.
Here is my most recent lesson guide - if you would like a copy, feel free to email me and I can send you the Excel file. I hope you enjoy the images and the ideas behind my lesson plan guide.

Monday, September 3, 2012
SmartBoard Tips for the Beginner
I made it through the first day. Well, the first training day. Other than it being total and utter chaos, it went alright. Although reflecting on the experience, I have realized that a lot of it went over my head. I feel that I am no where closer to understanding what I will be teaching and what my expectations are than yesterday. But, I did receive the opportunity to attend SmartBoard training today, and I have learned many new tricks with the latest version (11).
The first neat trick I learned was that using the magic pen you can now have disappearing lines, a magnifying glass or a spotlight! No more using the always apparent toolbar on the side! All you need to do is open up SmartNotebook, select the pen, then the magic pen and then follow of the these three steps:
Hope this SmartBoard tip will help you get started on your own SmartBoard creations! I will keep you posted on mine as I develop them for all of my Math classes this year. As I am fortunate enough to have a SmartBoard in the classroom I will be teaching in, I expect to be making many fun and interactive SmartBoard
The first neat trick I learned was that using the magic pen you can now have disappearing lines, a magnifying glass or a spotlight! No more using the always apparent toolbar on the side! All you need to do is open up SmartNotebook, select the pen, then the magic pen and then follow of the these three steps:
- Draw whatever you would like - the pen marks will disappear in approximately 7 seconds. This is great for times where you need to point out an important term, fact or image but do not want to have your ink marks left (and do not want to bother to erase them).
- Draw a circle - the circle will then turn into the spot light. Moving the spotlight around the page will allow you to highlight various areas of your screen to the audience and focus their attention on that portion. The size of your spotlight will depend on the size of the circle you draw.
- Draw a rectangle - yes, you guessed it! Drawing a rectangle will create a magnifying glass over that portion of the image. For the best results, make sure to draw a small rectangle.
Hope this SmartBoard tip will help you get started on your own SmartBoard creations! I will keep you posted on mine as I develop them for all of my Math classes this year. As I am fortunate enough to have a SmartBoard in the classroom I will be teaching in, I expect to be making many fun and interactive SmartBoard
Sunday, September 2, 2012
Tomorrow it all Begins
Tomorrow morning will be my first official day as a teacher. My five years of post-secondary education has said to prepare me for this, but I do have to admit that I am still kind of worried. Although tomorrow is a training day, school does not start until Wednesday, I am a bit unsure on what to expect.
I am looking forward to this new adventure, but there will be a lot of "firsts" tomorrow. Firstly, this will be the first time I will be taking the bus to the school I will be working at and the first time I will be relying on the bus to get me there. This will be the first time I will be an official teacher, and the first time I will be preping for the school year ahead of me.
My nervousness won't keep me up tonight, but is always in the back of my mind. Teacher's college and my practicum experiences (including Co-op throughout my ugrad) has provided me with the experiences for being in the classroom, not so much starting and intially creating the classroom rules and boundaries. It is my responsibility to go into the classroom and ensure that it is a safe and positive place for all students to learn. Am I up for the challenge? Of course - I figure that the first class or so may be difficult, but after the first few classes I will be an old pro at it.
For the bus I can either get the 7:30am bus or the 8:00am bus. The earlier bus allows me to be at my school for 8:00am whereas the latter brings me to work at 8:25pm. As I am required to be there for 8:30am tomorrow morning, I think I will play it safe and catch the earlier bus - bringing a book or something with me to pass the time.
Overall, tomorrow will be an interesting day - a day I am definitely looking forward to. Tomorrow I will officially be a teacher, preping for my first classes and setting up my own classroom!
Saturday, September 1, 2012
Flying High
There are so many different ways to book air plane tickets, through a Travel Agent, online from the airline, online through a third party, etc. With so many different outlets of tickets and prices how do you choose the best ticket? How do you know it is the cheapest ticket?
How did I get over to the United Kingdom - through a lot of conversations and websites we selected Air Canada and Iceland Air. We booked through the Iceland Air airline website.
Leaving Toronto Pearson Airport, we flew domestically with Air Canada to Halifax. This flight was an hour and a half in the air. The bonus of flying to Halifax first is that it is domestic and therefore we were not required to arrive to the airport until 90 minutes before take-off.
After our journey to Halifax, we transfered to an Iceland Air plane and then took off for Iceland. The journey, although a bit longer than the first flight, totally three hours and forty-five minutes. Although the flight was not that long, the time change pushed us ahead four hours.
Once we landed in Iceland, the two hour and forty-five minute layover was long but it gave us time to walk around and be off of an air plane. Getting back up in the air, Iceland Air took us then to Manchester for two and a half hours with an hour time change. Landing in Manchester, we collected our baggage and moved forward in our travels to Cleethorpes.
Why did we take such a round-about way of getting across the pond? Travelling with Iceland Air we were able to have two free checked bags and one carry-on. The price? When we flew, it was $655/person (including taxes). All of the other airline companies allowed one checked bags. The additional bags varied in price. After looking at the amount of stuff we wished to bring over with us (although I am sure if required, we would have fit it all into one suitcase), we felt this would be our best choice.
Our next trip we will probably focus on price and let that determine our flight, but to live comfortable with our things from Canada we decided two bags trumped the price of the flight. Best of luck picking the best flight for you!
Subscribe to:
Comments (Atom)